Inkscape Graphics Tutorial
| This tutorial seems to be outdated. The setups and hints no longer work with an up-to-date version of Inkscape or GIMP. |
This tutorial is to teach you how to use Inkscape and The GIMP to create graphics for Commander Keen, and to go over a few advanced methods. The tutorial is split into a few parts. If you have any questions, you can usually find me on the #keenmodding irc channel or feel free to pm me on the Commander Keen forums. I use the handle "fantomx11" on both of those.
Setting up your environment
There are a few things to do that make it easier for Inkscape and The GIMP to create the 16 color graphics that the EGA graphics mode uses. To begin, you want to download the Standard EGA Palette. This is a GIMP palette which is the format that Inkscape uses as well. You will want to put a copy of this palette in your GIMP palettes and in your Inkscape palettes so you can select the EGA colors more easily. Both the GIMP and Inkscape palettes are stored in your user folder:
For Windows 7 they are:
- %USERPROFILE%\AppData\Roaming\inkscape\palettes
- %USERPROFILE%\.gimp-2.6\palettes
(%USERPROFILE% is typically C:\Users\username, but you can copy and paste the whole line into the Run box to open the target folder directly.)
For Linux they are:
- ~/.config/inkscape/palettes
- ~/.gimp-2.[68]/palettes
Setting up your Inkscape file
Now that you have a nifty EGA palette, go ahead and start up Inkscape. On the palette bar at the bottom, you can click the little triangle on the right side and your EGA palette should show up in the list.
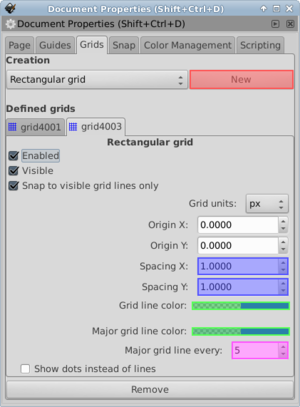
Next you'll want to set up your grid. Go to the document properties (ctrl+shift+d) and click on the grids tab. I usually use two rectangular grids when I'm working with Keen Graphics. One grid is for helping define the tiles, the other is to help reduce anti-aliasing as much as possible. Anti-aliasing is a good thing and creates smooth graphics, but if you have too much of it, you end up with blurry graphics. Especially when you're dealing with low resolution and low color graphics such as the ones found in Keen games.
Setting up the Large Grid
- Ctrl+Shift+D to bring up the Document Properties dialog, and select the Grids tab
- Click on "New"
- Change "Spacing X" and "Spacing Y" to 8
- Change the "Grid line color" to Red: 0, Green: 0, Blue: 0, Alpha: 64
- Change the "Major grid line color" to Red: 0, Green: 0, Blue: 0, Alpha: 255
- Change the "Major grid every" to 2
Setting up the Small Grid
- Click on "New"
- Change "Spacing X" and "Spacing Y" to .5
- Change the "Major grid every" to 2
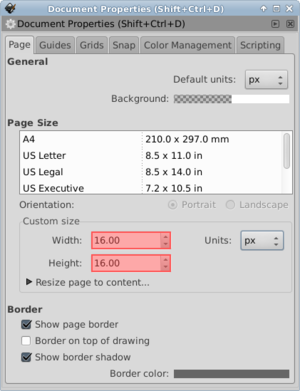
Before we are done with the Document Properties dialog, go ahead and select the Page tab and we'll set the size of the document.
I've highlighted the width and height in red, what you put in those fields depends on how big of a graphic area you are working on. In general backgrounds are large (96x96 and up, and foregrounds are small (64x64 and lower). Of course, being Keen graphics, they are always multiples of 16.
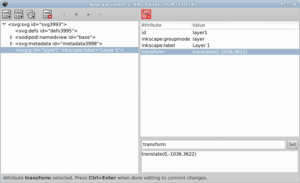
Finally, just for ease of use if I have to do any direct XML editing, I go into the XML view, and delete the transform attribute.
- Hit Ctrl+Shift+X to bring up the XML Editor
- Find layer1 (on the left side)
- Select the transform attribute (on the right side)
- Click the "Delete Attribute" button (in red)
Now you have a nice clean SVG file to create awesome new Keen graphics in.
Creating a simple beveled tile
For the first tutorial, I will create a simple beveled tile with a little bit of texture. This will help you familiarize yourself with some of Inkscape's controls and how to convert a truecolor image to one suitable for EGA using GIMP.
- Go ahead and set up your file as described above. The page size should be 16x16.
- A couple of things to keep in mind: The 4 key will automatically zoom the window to the extents of your drawing. The 5-key will zoom it to the extent of the page. These are useful for quickly getting to the view you need.
- Next create a simple square that covers the whole image
- Hit F4 to activate the square tool
- Starting from any corner, hold the left mouse button down, and move the mouse to the opposite corner. You'll notice how the corners snap to the grid.
- Now, the color settings are probably not right. Inkscape tries to remember the last color settings you used for a tool. It doesn't always get it right, but that's no big deal.
- If your square has a line around the edges of it, that means that it has a Stroke set. Strokes are good in Keen graphics for adding borders around things, but in our case, we do not want one. So, hold Shift and click on the left-most box of the palette (the white box with an "X" through it on the row of colors at the bottom).
- What we just did is "Unset" the Stroke. By default, selecting a color sets the Fill, but holding Shift when selecting a color, either from the palette or the eye-dropper tool (we'll cover that later), sets the Stroke instead. On the palette the white box with the "X" is an "Unset" color
- Now we want to set the fill of the square to the proper color. I've decided to make the main part of my box dark green by clicking on it in the palette row.
- If your square has a line around the edges of it, that means that it has a Stroke set. Strokes are good in Keen graphics for adding borders around things, but in our case, we do not want one. So, hold Shift and click on the left-most box of the palette (the white box with an "X" through it on the row of colors at the bottom).
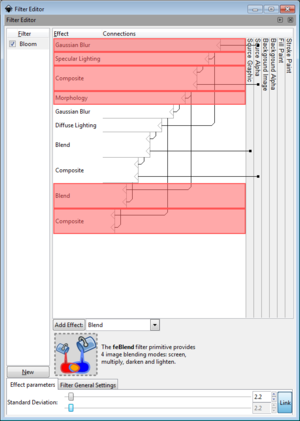
- Now that we have a green square, we need to give it a nice bevel. There is a built in filter for bevels. It may not be perfect, but it will give us a good start on it. So, select your square and click on Filters->Bevels->Bloom. Now we need to fine tune it for our needs.
- Open the filter editor by clicking on Filters->Filter Editor
- You can see the default bloom filter in the image to the right. I have highlighted the elements that need to be deleted with red. You delete an element by right-clicking on it and selecting "remove". Now, it's time to adjust the remaining filter elements.
- Set the Standard Deviation on the Gaussian Blur to 1.0. The Diffuse Lighting, has more options, and thus more to change. Going down the list, set the Surface Scale to 4.0, Constant to 1.0, Kernal Unit Length may be left at 0.0 and Light Source may be left at "Distant Light Source". Finally, set the Azimuth to 315 and the Elevation to 45.
- Now that we have o


