KEENGINE
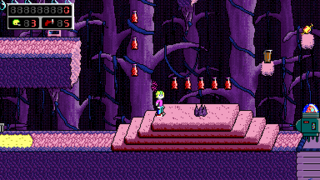
KEENGINE started as a simple tech demo written by Rübennase. The demo had Keen running and jumping around a simple level with a smooth scrolling camera.
K1n9_Duk3 jumped in after this first tech demo was released and fixed some problems regarding the graphics mode so that the program could be run and tested by any member of the German Keen community. Shortly after that, the renderer was rewritten so that it would scale the default resolution of 320x240 to any resolution.
After tons of other additions to the tech demo, including sounds, menus, a text viewer and demo recording, the engine was eventually named "KEENGINE" as of version 0.27.
Engine design
The engine is written under Windows using BlitzMax. Since BlitzMax is available for Windows, MacOS and Linux, it should be very easy to port the engine to those operating systems. All you need to do is get the source code, a version of BlitzMax and compile it.
The KEENGINE was designed to make modding extremely easy. All the important tools (i.e. map editor and tileset editor) are built in the engine.
Current features
- Walking and slope walking
- Jumping and falling
- Using the pogo stick (plus some sort of Impossible Pogo Trick)
- Collision detection
- Climbing on poles
- Shooting
- Switches and teleporters
- Galaxy-style menus and help sreens
- Multi-language support
Controls
The controls of the engine in its current state are the same as that of the original games. The keys can be re-assigned in the game.
- Keys left and right move Keen around the playfield.
- Key down will make Keen look down.
- Key up will make Keen look upwards.
- Ctrl will make Keen jump. Jump height is dependant on how long the ctrl key was pressed.
- Alt will activate/deactivate the pogo stick. Keen keeps on jumping low, but will blast into the air once you press ctrl during pogo mode.
The engine also supports gamepads (for in-game control input only!), but there is currently no way to configure controls for that.
Games made with KEENGINE
KEENGINE was made for the CKFSC Fangame, a community project in the formerly existing German Keen community Commander Keen Fan Site Celle. Some of the graphics and actors made for the CKFSC Fangame are used in the KEENGINE tech demo. Aside from the engine, the CKFSC Fangame never went beyond the planning stage. Other games, however, have been made with KEENGINE and were released in some form, as listed below in alphabetical order:
- Aliens Ate My Little Sister!
- Foray In The Cherry Blossom Forest
- Fribbulus Xax Falls
- Planet Cloudius IX
Editing
How to set the number of levels, file names, titles and messages
Edit the "game.ini" in the "Data"-folder of the game and locate the [LEVELS] section in the file.
The following entries will be read by the engine:
max level = INT
final level = INT
 worldmap = STRING
 worldmap title = STRING
 worldmap message = STRING
 level# = STRING
 title# = STRING
 message# = STRING
(# can be any number from 0 to the value of "max level", without any leading 0's)
"max level" basically tells the game how many level#, title#, message# values need to be read from the ini file. The default value is -1, which means only the worldmap settings will be read from the ini file.
"final level" defines the level the player has to finish to complete the game. This will be the value of "max level" by default.
"worldmap" is the file name of the world map (without the .map extension!) and defaults to an empty string. If you're using a world map, this will be the map the player starts in when a new game is being started.
Note: If "max level" is < 0 and "worldmap" is set to an empty string, the game doesn't know where to start a new game. So when you start a new game, you'll get to select the level file yourself. This is useful if you want to playtest a level without having to get to the level first.
"worldmap title" is the title of the world map that will be shown in the status menu. The default value is an empty string, in which case the game will use the title declared in the map file of your world map.
"worldmap message" is the message that will be shown upon (re-)entering the world map. The default value is an empty string, in which case the game will use the default message "Keen enters %1" where %1 is the title of the map.
"level#" declares the file name of your level number #. The default value is "Level#".
"title#" is the title of level # that will be shown in the status menu. The default value is an empty string, in which case the game will use the title declared in the map file of the level.
"message#" is the message that will be shown upon (re-)entering level #. The default value is an empty string, in which case the game will use the default message "Keen enters %1" where %1 is the title of the map.
Note: The titles and messages of all levels can be changed by language files. The titles and messages in "game.ini" should all be in English, as this is the default language.
How to add new actor classes
To add new actors, you'll have to modify the source code and create a new actor class.
You'll need to get BlitzMax to compile the code. If you're really cheap and want to use the BlitzMax Demo, you should consider installing it on a virtual PC.
There are 2 files you need to take a look at: KeenConsts.bmx and Actors.bmx.
At the end of KeenConsts.bmx, you'll find a list of Actor ClassIDs declared as constants. Just pick a number that is not used yet and add a new ACID like this:
Const ACID_MYACTOR = 17
Then you can edit Actors.bmx and create a new class ("Type" in BlitzMax syntax) that extends TAIActor (or any other class that extends TAIActor):
 Type TMyActor Extends TAIActor
   Method New()
     BlockX = ...
     BlockY = ...
     Anims = ...
     PicW = ...
     PicH = ...
     ClassID = ACID_MYACTOR
     ...
   EndMethod

   ...

 EndType
It is very important that you set the ClassID for your new actor to the correct value in the New() method of your class. Otherwise some weird things may happen upon saving and loading a game. Please note that you'll have to write some more code for your new class than just the New() method. Look at some other Types to get an idea of how to do this.
To make the new actor Class available to the game, you'll have to add code for it to the GetActorByACID-function at the beginning of Actors.bmx. Just add 2 lines like this:
 Case ACID_MYACTOR
   Actor = New TMyActor
Compile it and you're basically done. Now all that's left to do is to add a MapItem with the new actor's ClassID (17 in this case) so that you can place the actor on a map.


