Pyramid of Shadows
| Game | Keen 4 |
|---|---|
| Level number | 12 |
| Location | Shadowlands |
| Collectibles | [[Has collectible::Council Member]] |
| Dimensions | 100 x 99 tiles |
| Total points | 33,000 |
| Total ammo | 7 Neural Stunners7 ammopack <br />7 VorticonHyperPistol <br />7 Pistol <br />7 SuperFlowerPower <br />7 Raygun <br /> |
| Extra lives | 8 |
| Song | Too Hot to Handle |
| Required? | Yes |
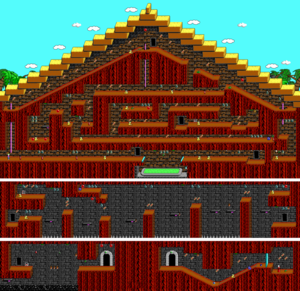
The Pyramid of Shadows is a level in Keen 4, one of the Pyramids of Shadowlands located in the jungles of the Shadowlands of Gnosticus IV. It is one of the two stepped-pyramids, along with the Pyramid of the Moons. It has a painting of a sun half in shadows, half bright over its entrance.
The Pyramid of Shadows is a hard level, consisting of three main sections: the pyramid itself, with lots of winding passages; a first underground cave area; and a second, lower, underground area, containing a trapped Council Member.
As in all the pyramids, the most common hazard is the knife shooter. There are also several moving shovels, specially in the main corridor; a big pool of acid; several spikes in the lower cave areas; and a tar pit in the lowest cave. The level is populated by Poison Slugs, Licks and Skypests.
The main pyramid area consists of a small maze of tunnels, with several dead-ends which usually contain Neural Stunners or point items. The maze has to be entered from the top of the pyramid, which can be reached by climbing the first pole in the main corridor, or through the door near the acid pool later in the same corridor. The objective of the maze is to get to a switch that will activate a bridge over the acid pool. Next to the switch there is a door that leads back to the aforementioned door next to the acid pool. After the bridge, another door leads to the first underground area.
The first cave area consists mainly of several holes filled with spikes, with falling platforms above them, and small pieces of land in-between (the last hole contains no spikes, though). At the end of the spike holes there is a door that leads to the second, lowest cave area. In this area, Keen has to use a switch to activate a moving platform that will take him over the tar pit, to the stone door to the Council Member area. In this last area, Keen only has to get a blue gem and open the door to free the Gnosticene.
Miscellaneous info
- There are several secrets in the level. In order to get the Lifewater Flask on the right side of the acid pool, Keen has to get to the first underground area through the door. Once there, there is another bridge switch, that will reopen the closed bridge. Then Keen has to go back through the door, and he can carefully fall into the right side of the pool and get the life.
- Another secret is right after entering the lowest area by the tar pit. Once Keen gets on the moving platform, he can "duck" (by looking down), and enter a hidden passage. Once the platform hits the hidden wall and starts to return, Keen can drop down to a passage with 6 Lifewater Flasks and a Neural Stunner. There is also another extra life on the way to that passage (though it cannot be seen), but it is under the platform and over the edge of the map (there's no tar in there), so it can only be obtained by falling off the platform and then dying, or cheating. It is possible to escape this area — to the far right is a vertical shaft with a hidden pole in it, which leads to the top of the area; afterwards, running to the right will drop you next to the Council Member.
- There are a total of 33,000 points in here. It includes 7 Shikadi Sodas, 49 Three-Tooth Gums, 9 Shikkers Candy Bars, 11 Jawbreakers and 1 Doughnut and Ice Cream Cone alike (700 + 9,800 + 4,500 + 11,000 + 2,000 + 5,000 = 33,000). The total of drops is 57, and there are the eight Lifewater Flasks.
- See also Pyramids of Shadowlands and List of Keen 4 Levels.

